Learning how to make a crop top is easier than you think. We'll cover three methods — feel free to adapt them how you like to create more complex designs.
Upcycling is the process of transforming waste materials into new products, such as fashion, furniture, and crafts. The term was coined in the 1970s by architect and designer William McDonough and chemist Regan Dunn in their book “Cradle to Cradle: Remaking the Way We Make Things”. Upcycling is a way to reduce waste and save the environment by using what would otherwise be considered trash.
This includes items such as old clothes, old books, and even old electronics. The process of upcycling is simple: take an item that you or someone else no longer needs and reuse it in a new way. The goal is to create a new, more useful product that can be used by someone else or reused again in the future.
If you love the look of crop tops but don’t know how to create your own, all you need is a few shirts or old sheets, a sewing machine or needle and thread, and some spare time. Here, we’ll look at three easy upcycling methods for old clothes and show you how to make a crop top.
How to Make a Crop Top: No-Sew Method

(Foto: Aisha Williams / Utopia)
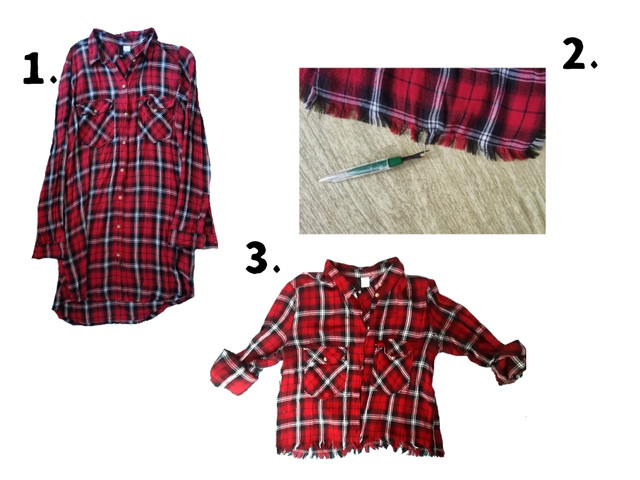
The first and easiest way to make a crop top is to turn an old shirt into one. You can turn a shirt into a crop top by cutting off the bottom of your shirt and cutting off the sides until you have a crop top. You can use a shirt or t-shirt you already own or look in a thrift shop for a design you like. There are many ways to do this, but the easiest is to use a woven shirt or t-shirt to get the best outcome. Woven materials are great for creating an edgy look. Here, we’ll show you the basic steps and guide you through them.
Materials:
- Old shirt (woven material, ideally- a plaid shirt)
- Measuring tape
- Chalk or material pen
- Ruler
- Scissors
- Seam ripper
Instructions:
- With measuring tape, measure the shirt to decide how long you would like it.
- Mark the length with chalk or a pin. Consider the tassel’s length to allow enough material before cutting.
- Lay the shirt on a flat surface and cut across the desired length. Use a ruler if you want a straight cut.
- Using a seam ripper, gently pick at the row of horizontal thread nearest the edge, and continue to pick away until you have the tassel length you like.
- Be careful not to pick at the vertical threads.
How to Sew a Crop Top


(Foto: Aisha Williams / Utopia)
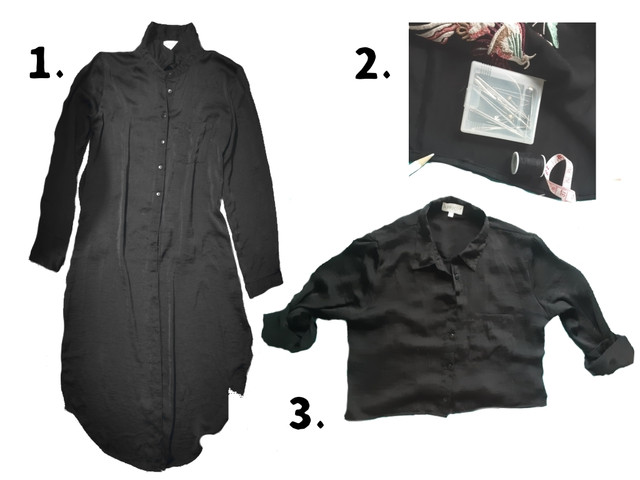
The following method takes a bit longer but is still relatively straightforward. We’ll follow the steps above but add a hemmed edge to our crop top. A hemmed edge will help the top last longer and is best for a more polished look.
Materials:
- Old shirt
- Measuring tape
- Chalk or material pen
- Scissors
- Ruler
- Sewing pins
- Needle/sewing machine
- Thread to match the color of your shirt
Instructions:
- With measuring tape, measure the shirt to decide how long you would like it.
- Mark the length with chalk. Take into account the length of the seam to allow enough room for the hem before cutting. As a guideline, add an extra half-inch along the bottom.
- Lay the shirt on a flat surface and cut across the desired length. Use a ruler for a straight cut.
- Now, open the shirt and fold the edge twice, about half an inch from the desired length. You can use an iron to flatten the edge or pin it down with sewing pins.
- Thread your needle or machine with the thread of your choice.
- Carefully sew along the folded edge to create the hem.
Side split
You can also try split sides if you want to experiment with your crop design. This means the front and back of the top can be different lengths. To do this, you’ll need to cut along the shirt’s side seam before you crop it. Decide the length of the front and back, leaving a margin for the bottom seams. Then roll the hems on the bottom and side so they overlap, and sew around the edges.
Simple Pattern for Making a Crop Top


(Foto: Aisha Williams / Utopia)
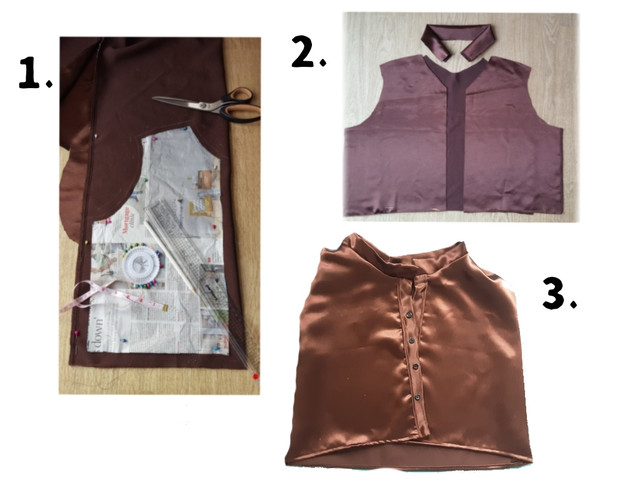
This method is a bit more tricky but gives you way more creative freedom. You can use an old sheet or take a look at a secondhand store to find a material you like. We advise using a crop top you already own to create the pattern and make things easier for yourself. You won’t need to worry about the size since you know it fits you. You’ll also need some large sheets of paper to draw your design.
Learning how to make a crop top with a pattern is simple once you understand how tops are made. Depending on the design, it will typically have a back, front, sleeves, and possibly a collar. Feel free to stick to the front and back if adding the rest is too time-consuming.
Materials:
- Crop top
- Large sheets of paper or newspaper
- Pen or marker
- Old sheet (Material)
- Chalk or material pen
- Scissors
- Sewing pins
- Needle/sewing machine
- Thread to match the color of your shirt
Instructions:
- Take your existing crop and lay half over a sheet of paper with the sleeves folded inwards (if any). Draw around the edges. This will be your front pattern.
- Take a new sheet of paper. Turn the top on its back with sleeves folded in once more. Draw around the edge. This is the back pattern.
- Cut your outlines from the paper.
- Fold your material in half. Lay the pattern on your material and draw around it. Add approximately half an inch extra around the edge (this is for the seams).
- Cut out the patterns.
- Place the top and bottom pieces of cut-out material over each other. The pattern or top side of the sheet should still be facing inwards. Pin the edges together.
- Sew along the edges roughly half an inch from the edge. Don’t forget to leave a gap for the neck, sleeves, and waist.
- Roll the edges of the collar, bottom, and sleeves to create the hem. Pin and sew.
Lastly, turn your shirt inside out, and you’ll have your crop top. See below for some optional extras that will make your homemade crop top pop.
Optional Extras


(Foto: CC0 Public Domain / Unsplash / Tima Miroshnichenko)
Collar
If you want a collar, measure the length of the collar on your existing collar.
- Draw the outline on a piece of paper. Allow an extra ½ to 1 inch for the hem.
- Double the material and draw around your pattern.
- Cut it out and turn the material inside out.
- Fold the material over and sew around the edge. Pull the material out from the inside.
- Lay the sewn edge along the edge of the top collar, and sew.
Button
To add buttons to your crop top, you need to ensure your front pattern is split in two, allowing an extra 1 to 1½ inches. You will also need two strips of material on each side of the opening where the buttons will go. These are created like the collar.
- Measure the length of the top, allowing a margin for seams, fold, and sew.
- Turn them inside out and attach them to either side of the opening.
- You can sew on buttons by hand with a needle and thread.
- For the holes, mark splits along the line of the material strip.
- Sew an outline around where the holes will go. Once sewn, you can cut the split.
As you can see, there are many ways to make a crop top. Root around your home or local thrift store to find many bits and pieces to help you upcycle. You can create more adventurous designs to suit your style and preferences with a bit of practice. It’s fun and lets you keep up with the latest fashion trends without the price tag or reliance on fast fashion.
Read on:
- Visible Mending: Giving New Life to Old Clothes
- How To Make Tie-Dye Shirts: A Step-by-Step Guide
- 7 Upcycling Ideas for Home Decor
Do you like this post?


