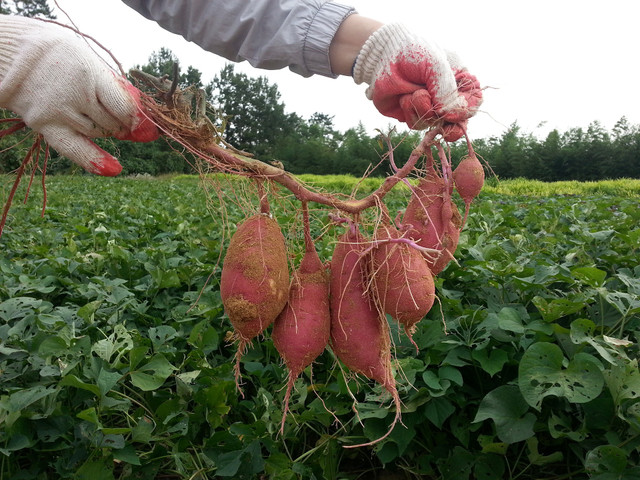
Today’s article will share some tips and tricks on how to grow sweet potatoes in your very own backyard. Although growing this superfood is relatively easy, it does require a bit of knowledge beforehand, which is where we come in. Let’s begin!
Adding sweet potatoes to your diet will bring a plethora of health benefits as they are bursting with vitamins, fiber, minerals, and antioxidants that can help you feel better in both your mind and body.
Sweet potatoes are also a wonderful source of beta-carotene, a provitamin, and antioxidants that the body converts into vitamin A. Research has shown that these types of nutrients combat cell damage and can help reduce the risk of certain types of cancers.
When to Plant Sweet Potatoes
To reiterate, sweet potatoes are wonderfully versatile plants. Across the world they grow in both tropical and temperate climates, so you can grow them practically anywhere. Typically, they take between three to four months to mature so plan accordingly.
When it comes to growing them at home, it’s key that you plant them early for the full sun, but not so early that they could be killed by frost, as they are extremely sensitive to it. Therefore, we advise planting them in the sun roughly three to four weeks after the last spring frost when the soil has just warmed up. The optimal temperature range for growing sweet potatoes is between 60°F to 85°F.
How to Prepare a Plant Site
Although sweet potatoes grow best in a sunny garden plot, they can also thrive in other outdoor areas and can even be grown in pots. What is essential is that you choose an area that has maximum sun exposure.
You should also plant them in soil with medium-moisture soil that drains well. We also advise using lots of organic compost and avoiding nitrogen-rich fertilizers as they can make the sweet potato foliage above the ground grow at the expense of the crops underneath.
Both elements are key as sweet potatoes thrive the most in these conditions. When it comes to setting up a space for your potatoes, space each crop at least 12 inches apart and make holes between six to nine inches deep in the soil.
How to Grow from a Sweet Potato


Now the stage is set, the garden is ready, it’s finally time to plant sweet potatoes. Be mindful that sweet potatoes don’t grow like regular potatoes. In fact, they aren’t really in the same family as potatoes, which are nitrate plants.
Whilst regular potatoes are grown from ‘seed’ potatoes, our beloved sweet potatoes are grown from sprouts, or roots, known as ‘slips’.
Slips are the colorful vines that grow out of sweet potato when it’s sprouting. To create a new sweet potato plant, you must first cut these slips off and plant them in the ground. Remarkably, one sweet potato can produce up to 15 slips, which in turn can create 15 new plants.
If that wasn’t miraculous enough, from one sweet potato’s slips you could grow up to 30 lbs of new sweet potatoes. How’s that for a yield? Although you can purchase slips from seed stores, plant nurseries, or online stores, we recommend growing your own if you wish to be mindful of your carbon footprint.
Collecting Slips from a Whole Sweet Potato
As luck would have it, you can easily create slips from fully formed sweet potatoes. Be careful that store-bought sweet potatoes are sometimes waxed to prevent sprouting.
- Grab an ordinary sweet potato and slice it in half lengthwise.
- Next, place each half upon a bed of damp, organic potting soil.
- Cover each piece with a few inches of soil and make sure they are planted in both moist and warm conditions.
- Within just a few days, small roots should begin to develop and sprout from the soil.
- Eventually green leaves will form. Slips are ready to be cut and planted from these sprouts once they are 4 to 8 inches above the soil. Typically these take about six weeks.
Collecting Slips from Vine Cuttings
If you’ve already begun to grow sweet potato slips, or have a friend who’s begun the process, you can easily collect slips by cutting sweet potato vines that are already sprouting. Here’s how:
- Take a vine from some sweet potato roots that are already forming in your garden. Cut off 6 – 9 inches from the tips of the vine.
- Place these vine cuttings in water, any glass container will do.
- Once these vine cuttings begin to develop roots, plant them in a little pot with 3-4 inches of soil.
- Once your slips have grown sufficiently, replant them outdoors in a larger location or container. Keep them in a sunny spot in your garden with rich high-quality soil moisture.
Variations of Sweet Potatoes
Variety, as they say, is the soul of pleasure and fortunately for all of you budding home gardeners out there, there is a rich host of sweet potato varieties that you can grow and nurture with your fingertips. Here’s a list of some of the most common types below:
- Beauregard: A popular variety, this sweet potato comes with a distinct pale reddish skin with a dark orange-colored root inside. Takes approximately 100 days to mature.
- Centennial: Despite its suggestive name, this sweet potato variety takes just 90 days to mature. It’s known for its resistance to common diseases and fungi.
- Bush Porto Rico: This copper-skinned variety is a favorite choice amongst those with smaller gardens as it can produce extremely large yields in 110 days after planting.
- Georgia Jet: Like the Centennial, this potato is renowned for its fast maturity, taking just 90 days. It’s distinct in appearance for its reddish skin.
Plant Care Tips
Next, we’d like to impart wit and wisdom that is sure to lead to a bountiful harvest. Firstly, we wholeheartedly advise keeping the soil well-watered with 1 inch per week up until two weeks before harvesting.
Keep the plants well watered but be careful not to overwater your plants as they may rot. Sweet potatoes may still grow in poor soil conditions, but the roots may deform or clump together if the soil is also too heavy.
Depending on where in the world you grow your sweet potatoes, you may run into creepy crawlies and rodents that will make your life more difficult. Here are some tips to stay one step ahead of them.
How to Avoid Pests
Unfortunately, if you’re a gardener residing in the southern hemisphere, you’re a little more likely to run into pest problems than your northern counterparts. One of the biggest threats to the potency of your potatoes is weevils, ringworms, beetles, and other tiny insects.
It’s best to keep a watchful eye on your crops as pests and insects will puncture the stems and tubers (the actual edible potato part that grows underground) of your plants and lay larvae in the roots of the vegetables. Adult weevils tend to go after the leaves and vines.
Mice can also be a problem, so be on the lookout. You should switch the location of your plants every year if this is a recurring issue for you. If you’re growing your sweet potatoes in a large pot, you’ll make it much more difficult for rodents to access the tubers.
Fungus
Sweet potatoes can also fall victim to fungal diseases such as black rot, stem rot, or wilt. Stem rot can affect a plant that’s already been attacked by insects. Likewise, poor plant care can also lead to fungal infections.
Even if your plant survives, the harvest will be poor which could lead to a loss of both money and time, not to mention all the heartache. Therefore, we recommend only planting slips that come from healthy potato plants or varieties that are more resistant to disease.
When and How to Harvest Sweet Potatoes


Depending on the variety you’ve chosen, sweet potatoes are ready to harvest in just three to four months. You should be able to harvest your crops as soon as the leaves begin to yellow, although the longer you leave them, the higher the yield, vitamin content, and flavor of the potatoes.
Be careful not to leave them too long as the leaves will turn black eventually due to frost. Be very gentle when digging, as sweet potato tubers grow close to the surface. Their skins are tender and can be damaged and bruised easily.
Storing and Curing Sweet Potatoes
If you’ve made it this far, then massive congratulations are in order. All that’s left is the storing and curing part of the process before you can savor the rewards of your labor.
After you’ve harvested your sweet potatoes, transfer them to a spot that’s well-ventilated and warm, and humid (around 80 degrees). This final stage of the process is known as curing and it’s vital to give sweet potatoes their trademark taste.
Allow your crops to cure for 10 to 15 days, before carefully storing them in a wooden box or basket. Be sure to handle them carefully as they can still bruise quite easily. Nevertheless, your sweet potatoes should be good for about six months, so enjoy them at your leisure.
Tips on How to Use Sweet Potatoes
Before we leave you, we’d like to share some of our favorite tips on how you can make the most out of your new sweet potatoes. You can use them in soups, Currys, salads but also desserts. One of our favorite recipes is our vegan sweet potato burger.
** Links to retailers marked with ** or underlined orange are partially partner links: If you buy here, you actively support Utopia.org, because we will receive a small part of the sales proceeds. More info.Do you like this post?


