Become a sourdough buff in no time: learn how to make your own all-natural, homemade sourdough starter for both beginners and those looking for new tips.
Sourdough is the oldest form of leavened bread, dating back to 3700 BC. The fermented sourdough starter used in it acts as a prebiotic, feeding the “good” bacteria in your intestines. Like other fermented goods, such as Vinegar Mother or Sauerkraut Juice, many find it easier to digest than the alternatives, in this case, white bread.
Nowadays there are a huge variety of ways to use a sourdough starter, including cookies, muffins, pizza, and more. Once the starter is ready the discard (the bit you chuck away) can be used in immediate recipes such as crackers or pancakes.
A treasure in many bakers’ kitchens, why not learn to make a homemade sourdough starter yourself? The art of sourdough baking is both simple and rewardable (and worth the wait).
How to Prepare Your Sourdough Starter
There is no perfect recipe for a sourdough starter. How it thrives and what it needs depends on the starter itself and can differ from location to location. Many variables can determine a strong, active starter, including which specific flour or flour blend you choose, the hydration level, the feeding schedule, and the ratio.
Starters can exist and thrive at varying hydration levels, the most commonly used being the 100 percent hydration mixing equal parts flour and water. But some recipes also call for an Italian-style 50 percent hydration starter. A starter at 100 percent hydration is probably the easiest to use for beginners when maintaining, mixing into a dough, or calculating additions to a bread recipe.
Once you decide your variables it’s best to stick to them initially to give a stable environment for your starter to thrive. The most common feeding schedules are every 12 or 24 hours. Typical feeding ratios range from 1 (starter amount): 1 (flour amount): 1 (water amount) to 1:10:10. The more a starter is fed, the more time the microbe population will take to eat through the food and reach its peak. Therefore, in the beginning, it is wise to start with a 1:1:1 ratio. This can be adjusted later if the starter is growing too much in between feedings.
Although some recipes call for 1 cup flour, 1 cup water – this can become wasteful, expensive, and difficult to maintain, unless you want to bake a lot. 10 grams of water and flour are more than enough to get a sourdough starter thriving.
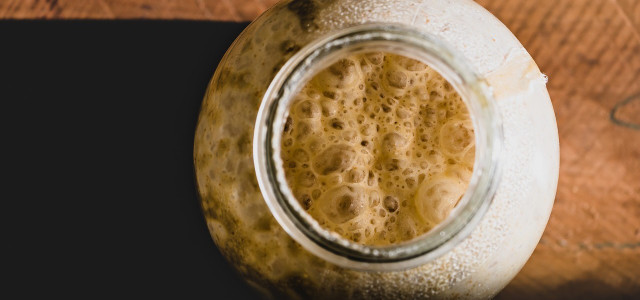
The process in a nutshell: start off with the chosen ratio of your specific flour and water, discard the ratio and feed with your chosen ratio at your determined feeding window. Repeat this process. After a while, the mixture will start to bubble and rise – it can take anything from 7 days to around two weeks to become a mature sourdough starter with a stable community of microbes that can leaven bread.
No two cultures are the same. Once your starter is alive you can experiment a little bit to find out what works best. At this point, some prefer to keep the starter in the fridge where it only requires feeding or baking once a week.
Choice of Flours for Your Sourdough

There are many different flours that can be used in your DIY homemade sourdough starter, ranging from wheat flour to cereal grains. Below you will find some of the most common and what they can bring to your loaf.
- All-Purpose Flour: Best to opt for a higher protein percentage to ensure more rise during baking and to choose an unbleached white flour to ensure a higher microbe population in the flour.
- Bread Flour: Bread flour generally contains more protein and therefore enables the starter and bread doughs to trap gas more effectively, resulting in that classic open crumb (the holes inside) of a sourdough loaf, otherwise known as alveoli.
- Whole Wheat Flour: Minimally processed and packed with nutrients and potential microbes, whole wheat flour provides faster fermentation for a starter. On the other hand, the inclusion of sharp bran can inhibit gluten development, which means your bread might not rise as high, retain its shape, or effectively trap gases.
- Rye Flour: A popular option for sourdough starters, this cereal flour is known for faster more efficient fermentation. With a lower gluten protein content than wheat flour, the result is a more slack, sticky, and dense dough, which due to its vast fermentative potential can result in a tall, flavorful, and aesthetically pleasing sourdough bread.
- Flour Blends: Many bakers use blends of flours to achieve starters with desired activity and flavor, e.g. using 10 % of rye with 90 % bread flour to give a boost of fermentative activity. Pre-mixing a huge batch can better prepare you for feeding.
Once the starter is active, you can always gradually transition to other flour or flour blend options, but this does make your starter more difficult to predict so take it slowly!
Also, gluten-free baking introduces a world full of new options, and combining them creates a better texture for your baked goods. In short: starches help create lighter gluten-free sourdough goods, while heavier flours such as buckwheat flour produce a denser, heavy finished product, the more neutral all-purpose flours like oat flour are often used as foundation flours, and the high fiber flour like coconut flour can be used in place of the heavier flour measurement but it doesn’t share the exactly the same characteristics.
Keys to Success for Your Sourdough
There is no one-size-fits-all roadmap to making a successful homemade sourdough starter. As with everything DIY, it takes patience, experimentation, and consistency to achieve desired results. The best time to feed is when your starter is at its peak rise. Some like to use rubber bands or pictures to measure this progress.
The hardest week is the first – you may observe rapid gains in height and sour flavors, but until your starter predictably rises, falls, and gives consistent aromas over a period of days, it’s unlikely that it’s ready to use for baking. You can do a float test to check if the starter is ready to use: place a small bit of starter in a bowl of water and check to see if it is active by whether it floats or not.
No Discard Sourdough Starter Recipe


Believe it or not, a sourdough starter does not require a discard and doesn’t have to be as difficult or time-consuming as you might think. It is important to measure accurately, and therefore grams have been chosen as 1 cup of flour can vary in weight depending upon the type.
You will need:
- 1 sterilized jar between 750ml (25 oz) and 1 liter (34 oz) in size
- 1 muslin cloth (cheesecloth) & elastic band
- 1 elastic band (optional)
- 1 scale
- 1 wooden stirrer (some metals corrode from the acid produced by the starter)
- 1 spatula
Ingredients:
- 175 grams (1¾ cup) rye flour
- 175 grams (½ cup + 3 tablespoons + 2 teaspoons) room temperature water
Instructions:
Day 1 – Add 25 grams of rye flour (3 tablespoons + 2¾ teaspoons) and 25 grams (1 tablespoon + 2 teaspoons) of room temperature water to the jar. Mix well with a wooden stirrer, such as a chopstick or a small wooden spoon. Cover with a muslin cloth and fasten with an elastic band to allow the starter to breathe. You can use another elastic band to track the increase in volume by placing it level with the top of the flour/ water mixture. Leave the jar in a sheltered spot for about 24 hours.
Day 2 – It won’t look too different yet, but you might see a few bubbles and/or notice a milky smell. Remove the muslin cloth and repeat the same process as the day before. Refasten the cloth and move the other elastic band to the new starter level.
Day 3 – By day three you might notice some changes: such as a few bubbles and a fruity smell. Repeat the same process. You might need to scrape down the sides with a spatula to ensure all the starter is being used.
Day 4 – You might notice an increase in volume and more bubbles, this does not mean it’s ready to be used yet. As mentioned above check for consistency in rising and falling over the next few days before deciding the starter is ready. Repeat the same process as the days before.
Days 5 to 7 – Keep going with the process. By this point, it should be pretty active and smell pleasantly sour and fruity. If it has been rising to twice its volume consistently after feeding by day 7 it is ready to use for baking bread. If not keep feeding until it does. Check your starter after feeding to prevent it from overflowing by ensuring it doesn’t fill more than half of the jar when it increases in volume.
Baking bread – Once your starter is ready for use you can bake your bread at its peak. As long as you leave a few teaspoons in the jar. That should be enough to keep the starter active.
At this point, the starter can be kept in the fridge. Feed the night before baking if the starter has been in a fridge for a week and two nights before baking for two weeks. For a longer period, it may take a little longer.
Read more:
- Gluten-Free, Yeast-Free Bread: A Life-Changing Recipe
- Is Bread Vegan? Brands, Recipes, and Tips
- Stale Bread Recipes: Four Creative and Tasty Ideas
Do you like this post?


